Ad/Tracker Blocking using Unbound on OpenBSD
- Keegan Brunk-Fraedrick
- Jun 27, 2022
- 4 min read

Updated: May 21, 2023
This tutorial illustrates the steps needed to install a DNS resolver using Unbound on OpenBSD 7.1. Unbound is then configured to sinkhole unwanted ads and trackers on a network-wide level while using DNSSEC to secure DNS communications. For more information on the installation, commands, and, processes of OpenBSD please refer to www.openbsd.org and https://man.openbsd.org/.
Overview
Network Configuration
Unbound Configuration
Starting Unbound and validating services
Network resolution with blocklists
Step 1: Network Configuration
Begin with setting a static IP address for our DNS resolver so we can host services to the network. After which, we download the root-hints file needed for DNSSEC validation.
Assign a static IP address for the interface that will be associated with our DNS resolver, so we can reliably host DHCP services for our network.
Assign the static IP address by editing the /etc/hostname.[interface] file.
#nano /etc/hostname.vio0
Configure the settings to allow for IPv4 address (inet), set the static IP address (192.168.64.25), assign the subnet (255.255.224.0), and broadcast address (NONE), then enable the interface (up).

Restart the network interface. #sh /etc/netstart
Verify that the changes have taken place by running ifconfig.

Verify outside networks can be reached by using ping to contact an outside server.
#ping 1.1.1.1

Step 2: Unbound Configuration and validation
Download the root-hints file that is needed for DNSSEC to function, before starting unbound and testing validation.
Download the root-hints file from internic, which point our DNS resolver to the primary root DNS servers of the internet. #ftp -S do -o /var/unbound/db/root.hints https://www.internic.net/domain/named.root
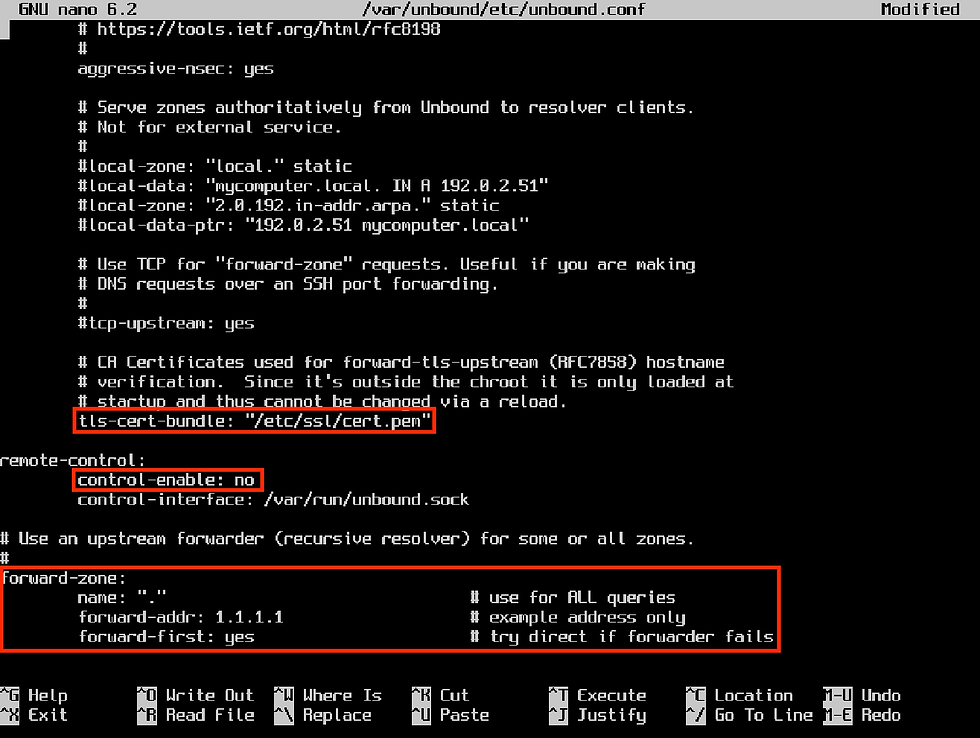
Once that is done we can being configuring the unbound.conf file in preparation for us starting and testing DNS services using DNSSEC. Configure the settings for unbound to indicate which interface to use, which files to use for DNSSEC validation, and which upstream name servers to use for resolution. #nano /var/unbound/etc/unbound.conf
Add, change, and uncomment the following lines in the unbound.conf file to unbound to serve outside DNS requests and enable DNS security features along with implementing DNSSEC. Interface: 0.0.0.0 interface-automatic: yes Do-ip6: no do-ip4: yes Enforce access-control by allowing the IP range of your home network and refusing everything else. root-hints: "/var/unbound/db/root.hints" harden-glue: yes harden-dnssec-stripped: yes use-caps-for-id: no harden-below-nxdomain: yes harden-referral-path: yes

Uncomment the tls-cert-bundle line along with all of the lines for the forward-zone, enabling Unbound to resolve DNS queries by using upstream DNS services. The resulting file should look similar to the one below. Make sure to add the IP address of your desired upstream DNS server after the "forward-addr:" line. Then disable remote control of unbound.
Start unbound to configure DNSSEC validation by downloading the initial trust anchor, the KSK (root signing key). #rcctl -f start unbound Check the configuration file for syntax issues. #unbound-checkconf If no errors are found, the result will look similar to this: Unbound-checkconf: no errors in /var/unbound/etc/unbound.conf With a working unbound.conf file, enable the rcctl daemon to start Unbound at boot and start the Unbound Service. #rcctl enable unbound After this, we need to reboot the system for DNSSEC validation services to start initiating the chain of trust that is started when the OpenBSD kernel boots. #reboot *Note: if your machine starts without access to the internet the chain of trust for the initial trust anchor will be broken and DNSSEC functions will be unavailable.
Step 3: Starting Unbound and validating services
Check DNS resolving services by changing the name-server address in the
resolv.conf file to the loopback address of our machine.
The resolvd daemon should now be stopped (failed) and editing of the resolv.conf file should now be possible. Configure the resolf.conf file to use the unbound name-server to validate requests by replacing the existing name-server with the loopback address of our system, so unbound can answer local requests. #echo "" > /etc/resolv.conf #echo "nameserver 127.0.0.1" > /etc/resolv.conf Verify the new name-server address is in place and reset the network.
#cat /etc/resolv.conf Restart the interface.
#sh /etc/netstart/
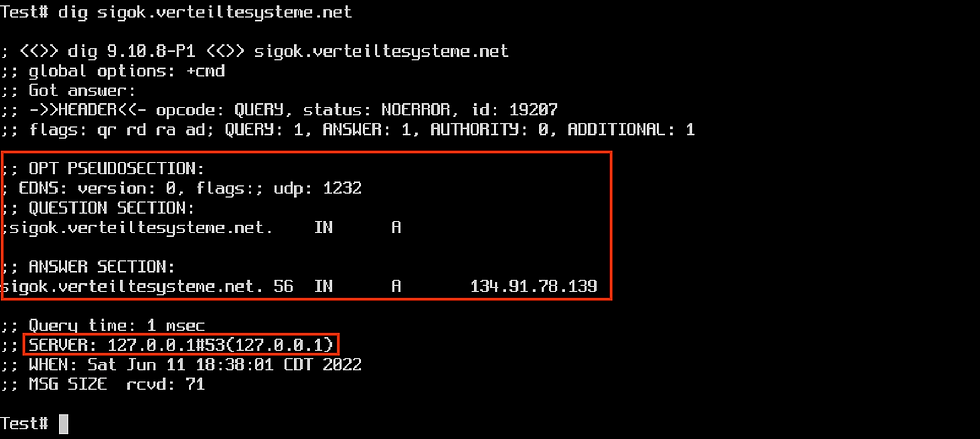
Test that unbound is resolving DNS requests by using the validation test from https://verteiltesysteme.net. #dig sigok.verteiltesysteme.net
Which should serve DNS A records from 127.0.0.1, which tells us that Unbound is resolving local DNS inquiries using the loopback address!
Verify that Unbound is operational and DNSSEC is retrieving authenticated DNS records. #dig com. SOA +dnssec The ‘ad’ flag under the header means DNSSEC is operational and the ‘RRSIG’ response confirms authentication of that request.

Running the dig command against this address should yield a SERVFAIL response.
#dig sigfail.verteiltesysteme.net

Step 5: Network-wide resolution with blocklists
This confirms that DNSSEC services are operational and validating DNS records! We can now add blocklists that will nto return (sink-hole) DNS requests for IP addresses of known ad servers and trackers. This can be done by editing the /var/unbound/etc/unbound.conf file again and adding the below line.
include: "/var/unbound/etc/blacklist.zone"

Next, we need to make the actual blocklist and then populate it with the IP addresses of the servers we want to block. I have included a useful list (in the proper syntax) that will block some ad servers and trackers on the internet.
*Note: I plan on adding for a way to easily download this to your machine, once I setup hosting for this file. For now, please download this text file and use scp to transfer the file to your machine. Make sure to rename the file to blacklist.zone and place it in the specified directory. Check the configuration file (which also checks the syntax of included blocklist) before rebooting and assigning the OpenBSD Unbound DNS resolver to handle network wide DNS requests. #unbound-checkconf
The result we either validate our configuration or return an error message. With the configuration file validated for possible errors, reboot the system for the changes to take place.
#reboot
At this point, all that is left to do is to assign the DNS resolver as the network DHCP server. This can usually be done from within the router under the ‘DHCP” or “DHCP Server” tab.

Once this is done, restart the router and repeat the dig validation tests on a
computer using your network to verify services are working and being resolved from the local DNS resolver. Both ads and trackers will be blocked on a network-wide level with nxdomain requests served for blocked webpages, like the one below.

Now it’s time to go over to https://d3ward.github.io/toolz/adblock.html and see those satisfying green circles confirm trackers and ads are being blocked on a network-wide level!
Comments